Creating Indicators
Built-in indicator methods provide a quick means for creating a display or calculated value that can be displayed on a chart or used in the script. Most indicator use parameters, but some don't require any. Before creating an indicator preview your intended indicator to determine if that calculation will require one or more parameters. When the indicator does require a parameter creation details can be reviewed here:
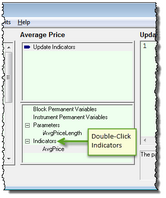
To create an Indicator in the Blox Editor, select the Indicators item and right click or use the Items menu. This will bring up the new indicator dialog:
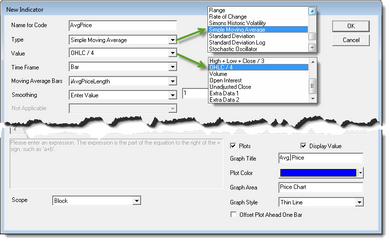
When the dialog shown here appears:
•Enter your indicators name
•Select a built-in calculation method
•Select a data record value to use in the built-in calculation
•Select the parameter property setting created to adjust the built-in calculation
•If the indicator is to plot on the chart, give it a name, select a color, and enter a name if the plot is to appear below the price display.
Naming Code:
This is the name which will be used to access the indicator in a script. In this case we named our indicator averageClose. We can use this like a variable in our scripts, with or without indexing. You can use any name here that complies with the rules for creating variables.
Using the indicator name without indexing refers to the most recent available data, today. Example:
IF averageClose > averageClose[1] THEN
OR
IF instrument.averageClose > instrument.averageClose[1] THEN
Type:
Indicators listed below are the names of the standard built-in indicators accessible from the Indicator section dialog shown above.
Most of the indicators require Parameter values, but not all of them. When selecting an indicator examine the fields in the dialog that are colored with a white background and enter or change the value shown where necessary.
Available Indicators:
Parameter Values:
The Value is the basis for the computation of the Indicator. The choices are:
Value Field: |
Description: |
|---|---|
Open |
The open for the bar |
High |
The high for the bar |
Low |
The low for the bar |
Close |
The close of the bar |
High + Low / 2 |
The average of the high and low |
High + Low + Close / 3 |
The average of the high, low, and close |
OHLC / 4 |
The average of the open, high, low, and close |
Volume |
The volume for the bar |
Open Interest |
The open interest for the bar (futures only) |
Unadjusted Close |
The unadjusted close for the bar |
Extra Data 1 |
The value of the extra data 1 field for the bar |
Extra Data 2 |
The value of the extra data 2 field for the bar |
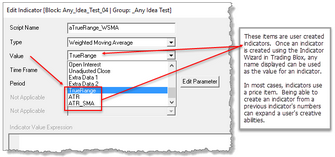
User Created Indicators |
When an indicator is created with Wizard Indicator tool, the names of the other indicators listed in the indicator list will be displayed in the Value section's drop-down list available values. Any of the names listed in the Value's list of names are available for an indicator. |
For example, a "Simple Moving Average" indicator that used a value of "High" would be a simple moving average of the instrument's high.
Time Frame:
Reserved for future use.
Parameters:
Most types of indicators require numeric constants for their computation. For instance, the MACD indicator requires the days for the long and short moving averages. You can select from a list of Parameters that you have created, or you can choose "Enter Value" and enter a constant value in the box to the right.
For many indicators, there is a final option called "Smoothing." This option will smooth the indicator by the bars indicated, using the EMA formula. If you enter 1 for the number of bars to smooth, there will be no smoothing.
Example: To create an RSI indicator with a smoothed signal RSI line, create two indicators, one with smoothing, and one without.
Scope:
Set the scope based on which blocks and scripts need access to this indicator. If you set Scope to Block (default value), only the scripts in the same block will have access to the indicator. If you set to Scope to System, then all scripts and blocks in the system will have access to the indicator. When System Scoped indicators are shared across a system, an IPV Series variable using the same name as the indicator must be declared in the other blox. In addition, you should enable the option "Defined Externally in another Block" so the same name IPV will be linked to the indicator in a different blox by telling the script parser the IPV variable is declared and defined elsewhere.
Plots on Trade Graph:
Check to have the indicator plotted on the trade chart. When you plot an indicator on the trade graph, you can select the Display Name, the Color, and whether the indicator should be offset by one day.
Displays on Trade Graph:
Check to have the indicators value displayed in the right panel of the trade chart, as the cross hairs are moved by the mouse or cursor. By clicking on the indicator name on the trade chart, plotting can be dynamically enabled or disabled. The indicator can also be removed from the chart.
Offset Plot by One Day:
This option shifts the indicator ahead one day. This is useful when your indicator is used for stop or limit orders, and you want the indicator to visually cross the bar as an indication your order was hit. This is only a visual change on the graph, and does not change the calculations or results.
Graph Area:
The text in this field will determine where the indicator is plotted. If you select "Price Chart" the value will be plotted on the price chart area. If you select any other text value, it will create a new chart and put the indicator there. You can have multiple indicators on the same chart area.
If the values of the indicator are not within the range of values shown for the instrument price bars, the indicator will not appear because its value will be out of range. If this absence is only occasional, assigning its Graph Area to the Price Chart will be useful. If it is most of the time, it will be best to assign the indicator to its own Graph Area by entering a name different thant Price Chart.
Graph Style:
Select a graph style for the plot.
Notes on Priming:
The maximum amount of bars required to prime this indicator plus one will be added to overall priming. If the indicator is a 10 day moving average, then the first day scripts will run is day 11. Overall priming is the maximum bars required for indicators plus one, plus the maximum look-back parameter plus one.
Links: |
|---|
Calculated Indicators, Creating Indicators, Custom Indicators, Indicator Access, Indicator Reference |
See Also: |
Edit Time: 9/26/2020 1:40:24 PM |
Topic ID#: 239 |


