Trade Chart
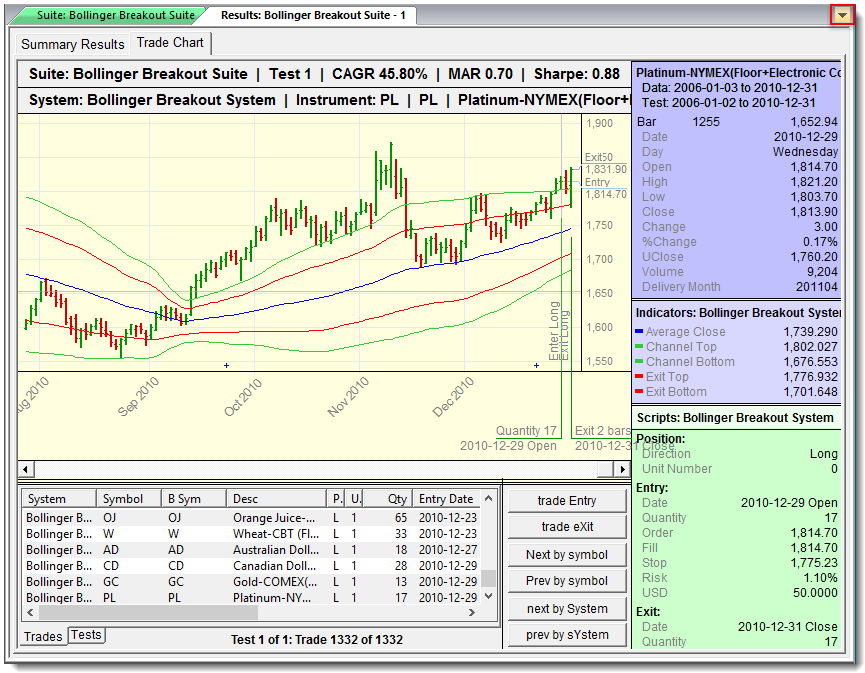
When the Trading Blox Preference Log Trades option is enabled, the Trade Chart will display the trades of a test. Specific details of selected trade will be displayed the Trade Details panel. Indicators designed to appear will be displayed and their values are visible in the Indicator panel. Information for any location in the chart area is displayed in the Price Data panel.
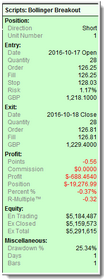
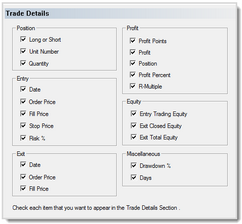
When some of the information in Trade Details is unselected, the Trade Details display window will show less information.
When the Log Trades option is unselected, there will be no trade information to display and the Trade Chart tab will be missing from all selected test results that were performed when Log Trades option was disabled.
When "Log Trades" in Preferences are enabled, the Chart Area shows these areas:
A complete list of each trade from each test is shown below the chart. When you click on a trade in the list, Trading Blox will select that trade and display it on the chart. You can sort the list by clicking on any of the column headers. For example, you can easily determine the largest percentage losing trades by clicking on the Profit % column. Or, you could sort the symbol column so all the trades for a symbol are grouped together. When a test has multiple steps from incrementing one or more parameters, the trades each step can be selected in the Test section of the trade record area.
Trade Chart Area: ^Top |
|---|
Entry and Exit Dates The entry and exit dates for the selected trade are shown below the chart date legend. These show the exact date and time of entry (Open, Day, or Close).
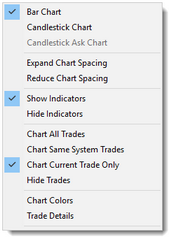
Trade Chart area displays the selected system trade record price data, indicators plots and Entry--Exit locations. How Entry and Exit are displayed on the chart can be changed by the controls in the main menu Chart Menu the Chart Trades Group. This set of controls can change whether all the Entry and Exit locations or a just the selected trade Entry and Exit location is displayed. Entry and Exit Prices The trade Entry, Exit, and initial Stop are plotted so you can visually see the exact trade prices. Price and Indicator Information The selected trade is plotted on a daily bar chart graph of the prices for the particular market or stock issue. The indicators for the system that generated the trade are also plotted on the graph so you can see how the system indicators control trade entry and exit. The Chart menu and associated buttons on the tool bar control which trades are displayed on the graph. Chart Control Options Chart information controls are available by clicking the right-mouse button so the control options shown on the left side appear. These options are text versions of the main menu Chart tab. Clicking on any of the controls will create a change when the control panel closes.Roll-Forward and Dividend Distributions
Roll-Forward and Dividend Distributions Stock and Futures will display the date markers for Futures roll-forward Multiple Suit Steps When a suite creates multiple steps each step can have different results and show different trades. This ability is controlled by the settings Reporting General Test Reporting sections where Small and Large simulation test determine when the Log Trades option is enabled.  Suite Stepped Test Chart Display Selection Table Test results where the Log Trades option was enabled during its multiple steps will have a record in the Test Table tab area. Each record listed will have Trade Records that can be selected and displayed in the chart area. NOTE: Before creating a parameter stepping simulation, the user should review the settings information established in the Preference section where Trading Blox Reporting General Trade Log decisions for Small and Large Simulation settings determine the information made available for Trade Chart viewing are established. |
Controls to change how information on a chart display are the Main menu's Chart tab section: Above display controls allow single-click access to common chart display controls that include: expanding and collapsing the width of a price bar; showing and hiding the trade indicators; and controlling how many trades are displayed at the same time; and others. |
Trade Records: ^Top |
Description: |
|---|---|
 Example Trade Record Table. |
|
System |
Unit's System Name. |
Symbol |
Unit's Symbol. |
B Sym |
Unit's Broker Symbol. |
Desc |
Symbol's market description. |
Pos |
Trade's position direction. |
Unit |
Trade's Unit number. |
Qty |
Unit's trade contract or share quantity.
Right clicking on the trade's quantity value will open the Trading Blox UNIT SIZE SCRIPT section where the scripted logic is displayed. |
Entry Date |
Unit's Entry Date.
Right clicking on the trade's Entry Date will open will open the Trading Blox ENTRY ORDERS SCRIPT section where the scripted logic is displayed. |
Entry Fill |
Unit's Entry Fill price.
Right clicking on the trade's Entry Date will open will open the Trading Blox ENTRY ORDERS SCRIPT section where the scripted logic is displayed. |
Profit % |
Unit's profit percentage rate. |
Exit Date |
Unit's Exit Date.
Right clicking on the trade's Entry Date will open will open the Trading Blox EXIT ORDERS SCRIPT section where the scripted logic is displayed. |
Exit Fill |
Unit's Exit Fill price.
Right clicking on the trade's Entry Date will open will open the Trading Blox EXIT ORDERS SCRIPT section where the scripted logic is displayed. |
Rule |
Unit's order information.
An Exit Rule is added to positions that are forced to exit by the application: •Broker Position Exit is caused by a new broker position that must exit the exiting open position, or a broker position of OUT. •End of Data is an exit on the last bar of data when Running a Simulation. These positions are not exited when Generating Orders. •Test End Exit is an exit at the end date of the test (based on the test start and end dates), when the last bar of data is not reached. |
Trade Record Controls: ^Top |
Description: |
|---|---|
Each of the six buttons provide make moving through the trade records simple. Each button's name has an active letter key that makes allows the user to focus on the display of trades simple. |
|
trade Entry |
Press the E key, or click the button to display the entry location. |
trade eXit |
Press the X key, or click the button to display the exit location. |
Next by symbol |
Press the N key, or click the button to display the symbol's next trade. |
Prev by symbol |
Press the P key, or click the button to display the symbol's previous trade. |
next by System |
Press the S key, or click the button to display the next trade. |
prev by sYstem |
Press the Y key, or click the button to display the next trade. |
Price Data Information: ^Top |
Description: |
|---|---|
Trade record selected in the Trade Record List will display information about the trade and the market where the trade was positioned. |
|
Cross-hair Details: ^Top
|
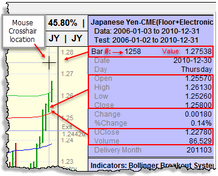
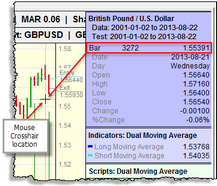
Information displayed on the chart can be viewed in detail in the price data window on the right side of the chart. Moving the mouse over the chart details will be updated as the mouse moves. Moving the mouse from sideways will show date changes, and moving the mouse up or down will display the price scale value changes.
As long as the mouse is above the price area of the chart the chart's data window will be displayed. Information displayed in the window can be held by stopping the mouse from moving. To lock the mouse location, double-click the left mouse button. Double-click the mouse again to regain mouse movement.
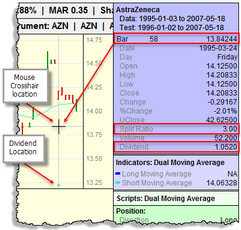
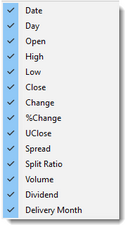
Data displayed in the price data window is dependent upon instrument type and the the price window settings. To see the available fields of information and those enabled, right-click on the price window and this list of data fields will appear:
To enable or disable the display of data field item, left-click on the item to enable or to disable. After an item has been clicked, the list of data fields will close. Right-click in the data window area to display the settings again.
Which fields that can be displayed is control by the instrument displayed in the chart area. This means that Futures and Forex instruments cannot display information the Split Ratio, Dividend information. Stocks cannot display the Delivery Month information. Information not available for an instrument will be hidden from the data window regardless of whether that information is enabled.
When a data item is disabled from being displayed, the price data window vertical size will be reduced. As the price data window shrinks, information below its location can increase when the windows in that area are not fully displayed. |
Indicator Information ^Top |
Description: |
||||||||||||||
|---|---|---|---|---|---|---|---|---|---|---|---|---|---|---|---|
Trading Blox Indicator Detail window default setting shows system indicator values aligned with the bar last used to calculate the value shown for current mouse position (See Offset Plot Ahead One Bar ). Custom indicators can be created to show an indicator's calculated value from an earlier period so that it appears at a later price location. |
|||||||||||||||
Indicator Display Information:
|
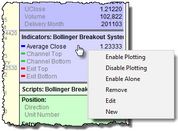
When a suite is selected and then tested, the chart display (see Log Trades) it will display indicators designed to appear in the chart area. Indicator appearance changed using the chart's indicator plotting control.
Indicator plotting control will appear as a pop-up display when you right-click on the indicator detail window. To change an indicators, click on the indicator name and then right-click and select a change action item.
Indicators can be offset on bar ahead to enable the value of the indicator calculated today to display its plot in the market's next price location. This can be changed by using the Trading Blox Blox Basic Editor, or by using the Indicator Display Edit option. |
||||||||||||||
Trade Details: ^Top |
Description: |
|---|---|
Each selected trade will show all the information enabled in the Trade Records table. This trade information is always displayed in the Trade Details window area. This display area shows the details like: entry and exit dates and prices, profit, profit %, entry risk %, trade duration, etc.
When the displayed screen is too small to display all the information, move the mouse cross-hair from the price area of the display so the Price Data and the Indicator Information panels disappear. Removing these two panels allows more lines of trade information to appear when those two panels are not displayed.
Moving the mouse back over the price display area will enable the Price Data and the Indicator Information panels to appear again.
|
|
A click of the right-mouse button anywhere on the Trade Details panel will display Trading Blox Preference's Trade Details information options.
Default is to enable all the available trade information fields.
When a trade is displayed on the chart and the mouse right-click displays the Preference's Trade Details information options, any selection changes made to those options will immediately be displayed in the Trade Detail panel after the Preference's Trade Details display is closed. |
Edit Time: 9/12/2020 9:50:00 AM |
Topic ID#: 4101 |

